Pages

Showing posts with label tutorial. Show all posts

Monday, 2 February 2015

FOTD// Peachy Keen


My go-to eye look recently has been pretty simple and sticking to mattes. However, I really wanted to play around with a little bit of colour and see what would work to make my eyes 'pop'. So I pulled out my LORAC Mega Pro Palette and inspired by the shades 'Apricot', 'Blush' and 'Merlot' created this fresh face of the day with peach tones throughout.

Starting with the base, I applied the Australis Primer all over the face and went straight to concealing using Benefit's Erase Paste under my eyes and then Maybelline Fit Me Concealer over blemishes and red spots. I'm obsessing over mineral makeup at the moment and the Maybelline Mineral Power Foundation and Finishing Veil have been favourites for a long time. Unfortunately they don't sell the finishing veil in Australia anymore but I highly recommend the foundation! To finish off the face, I added some warmth with Benefit Hoola Bronzer as well as the Shimmer Powder and Blush Stick from the Essence 'Bloom Me Up!' trend edition (which I forgot to photograph -oops!).
#dathighlight


For the eyes, I started by using the Max Factor Excess Shimmer Eyeshadow in '20 Copper'. This shadow has a really strange, mousey texture that I found is easier blended out with your fingers. All the other shadows I used were from the LORAC Mega Pro Palette. Through the crease I used 'Khaki', then starting in the inner corner I used 'Blush', 'Apricot' in the centre of the lid and then 'Mulberry' blended through the outer V. I applied 'Grey' right along the lower lash-line and blended 'Merlot' along the outer third of the eye up to the top lashes. I absolutely loved the look of the shimmery peachy shades with the dark berry shades to deepen the look!

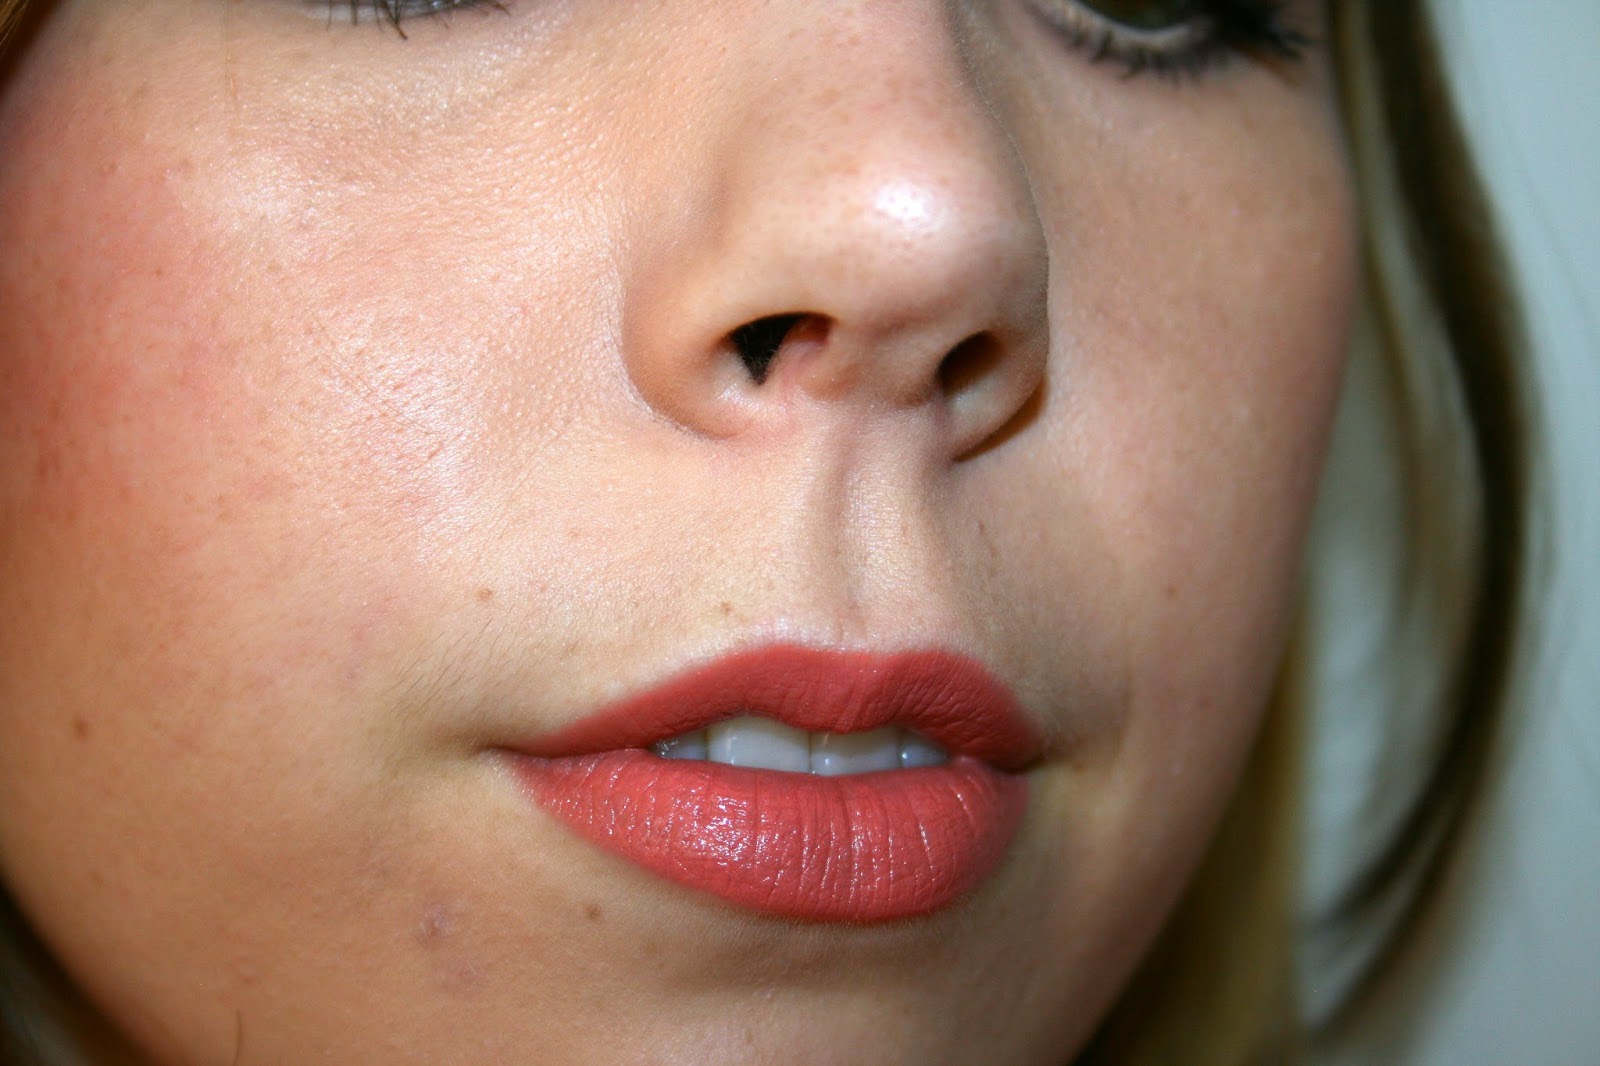
To finish off the eyes, I curled my lashes and applied a few layers of the Elizabeth Mott It's So Big! Mascara. For eyebrows I've gone back to using my Essence Eyebrow Designer in Blonde to create a natural, full brow. To complete the look I chose the new L'Oreal Color Riche Collection Exclusive Lipstick in 'Eva's Nude' for the lips which is such a beautiful peachy nude and I absolutely love the sheer, moisturising formula.
#moustache


xx Catherine
Follow me!

Instagram @_cat.mac
Twitter @cathsintents

Wednesday, 14 January 2015

Party Perfect in 5 Steps


With the new year just gone, I saw so many amazing glam looks up on Youtube. To be honest, I was a little intimidated because a lot of these looks featured complicated looking smokey-eyes. I love spending an hour or so getting ready but I can't even imagine how much time I would need take with my blending brushes to make sure my eye look was on point.

So instead of crying over my lack of makeup skills, I thought I would share with you how I like to do makeup for a special occasion. You can mix it up with shades or different finishes but when I get ready for a party it comes down to five easy steps:
  1. Flawless complexion with a fresh, glowy finish
  2. A pop of colour on the cheeks in a peachy coral or bright pink (a little bit of shimmer never goes astray either!)
  3. A sweep of bronzer all over the face
  4. Neutral eye look complimented with lots of lashes - add a bit of liner if you like!
  5. ...And for the lips I usually chose something fairly neutral, with a glossy finish to make my lips look plump and juicy.
I did the above look on my friend Natalie for a Christmas party she was going to. I used the base products mention in my sweat-proof makeup post to create a light-weight but flawless base, MAC Melba to add brightness and warmth to the face and shadows from the Lorac Mega Pro Palette for the eyes. In particular, I used the shade Apricot to tie in with the blush and make the eyes pop! P.S. how gorgeous does Nat look?

xx Catherine
Follow me!

Instagram @intentsbeauty
Twitter @cathsintents

Monday, 13 October 2014

Beginners Guide to Makeup Brushes: Face

I absolutely think that makeup brushes are 100% necessary in everyone's makeup kit. Whether you're a makeup enthusiast, wear makeup everyday as part of your routine or just on special occasions brushes are a fantastic investment and there are so many affordable options. This post will take you through the basics of face brushes and an eye brush post will follow shortly!

//Buffing Brush:

For me a buffing brush is the perfect option for creating a flawless, airbrushed look with foundation. Can be used with liquids, creams and mineral powder foundations. Buffing brushes are usually dense with relatively short bristles and can be domed, flat, angled or pointed in shape.

To apply products with a buffing brush simply buff in the product using a circular motion.

My choices: Real Techniques Buffing Brush (from the Core Collection $18.00), Real Techniques Expert Face Brush ($9.00).

//Powder Brush:


Powder brushes, as the name suggests is for the application of powder products, including powder foundation, translucent setting powder and even for blush and bronzer. Powder brushes aren't as dense as buffing brushes and are usually more "fluffy" and have long, flexible hairs.

To apply products with a powder brush, simply pick up powder from the packaging and sweep over the face.

My choices: Furless Must Have Pro Powder Brush ($14.95), Models Prefer Large Powder Brush ($5.00)


//Blush Brush:


Blush Brushes are similar to powder brushes in the sense that their hairs are flexible and soft but can come in all different shapes - rounded, angled or tapered. They are great for the precise application of blush and bronzer.

To apply products with a blush brush, tap the blush into the product and then sweep up the cheek bones or over the apples of the cheeks.

My choices: Real Techniques Blush Brush ($9.00), Real Techniques Stippling Brush ($10.00)

//Contour Brush:


A contour brush is great for applying bronzer or even blush if you're going for a more precise application. Contour brushes come in all sorts of shapes and sizes and can be flat (think the NARS Ita Brush), angled or a tapered pointed brush.

To apply bronzer with a contour brush, dip the brush into the product and tap off excess. Start from the edge of the face, starting from the middle of the ear and follow the cheekbone for 2-3 cm applying the product in a straight line to create a contour. Blend upwards.

My choices: Real Techniques Contour Brush (from the Core Collection $18.00), Real Techniques Duo-Fibre Contour Brush (from Duo-Fibre Collection $20.00).

---

If you like to experiment with makeup, even if it's not that often, having just these four face brushes in your makeup collection will make a huge difference and you'll start to see how much more precise your makeup application can be. However, if you're just the everyday girl and tend to stick with the same makeup look, I think you could get away with just a powder brush.

Real Techniques brushes are amazing quality for a great price and come in sets as well which makes them fantastic value - as you can see most of my recommendations are for Real Techniques brushes. I recommend purchasing Real Techniques from ww.iherb.com however, you can buy the range at Priceline in Australia.

I hope you found this post helpful!

xx Catherine

Follow me!

Instagram @cathsintents
Twitter @cathsintents

Wednesday, 9 July 2014

Winter Beauty Edit: Everyday Makeup Look and Eyeshadow Tutorial

It's day 3 of my WBE and I will be sharing with you my go-to everyday makeup look for winter. In the colder weather I prefer a medium coverage foundation that gives a velvety matte look paired with shimmery neutral eyeshadows and a bold lip. Check out my video tutorial on how to create my eyeshadow look as well as tips and tricks to remember when doing your eyeshadow.


Products Used

Face
  • Laura Mercier Foundation Primer
  • Laura Mercier Oil Free Supreme Foundation in Blush Ivory
  • Maybelline Fit Me Concealer in no. 15
  • Rimmel Stay Matte Pressed Powder in Transparent
  • The Body Shop Honey Bronzer in no. 1
  • Milani Baked Blush in Luminoso
Eyes
  • Elf Eyelid Primer
  • Maybelline Colour Tattoo in Bad to the Bronze
  • Chi Chi Nudes Eyeshadow Palette
  • NARS Larger Than Life Eyeliner in Rue Bonaparte
  • Maybelline The Falsies Mascara
Lips
  • MAC Rebel Satin Lipstick
I hope you've all been enjoying my Winter Beauty Edit and make sure you come back tomorrow and Friday for the final instalments.

xx Catherine

Friday, 4 July 2014

Tutorial: Ombre Lips

Ombre lips have been a huge trend this autumn and winter season! Its such a fun way to add a little extra dimension to your lip look that is still super wearable. I decided to create a really fun vampy lip with an ombre effect by following this really easy tutorial from boohoo.com.


To create my look I lined my lips with Essence Lipliner in no.5 'Soft Berry'. Using a clean lip brush I carefully smudged the liner towards the centre of the lip. Then using the lip brush again I applied MAC's 'Rebel' lipstick to the middle of my lips. To finish, I used Creme Brulee Butter Gloss from NYX to highlight the very centre of my lips - simple!


My tips for creating an ombre lip are:
  1. Choose a colour scheme: I went for dark berry shades, but pick a liner that is a darker colour than your lipstick. For reds, you might want to go for an orange or pink shade of lipstick.
  2. Make sure your lip liner is sharp: blunt lipliner is going to get messy!
  3. Use a lip brush: Using a lip brush to apply your lipstick will allow for much more precision and dabbing your lipstick on will add the the ombre effect.
I hope you enjoyed this post and let me know if you try the ombre lip as well!
- Also please excuse the faded foundation around my mouth - It is inevitable while doing lip swatches all afternoon!

xx Catherine

* This post was not sponsored.


Thursday, 22 May 2014

FOTD: Bronze and Bright Lips


This look was inspired by my new lipstick from Shanghai Suzy "The Gossling Lippie" which is an amazing bright orange. I love orange shades and this was is such a nice glossy formula. 

I recently received a new bronzer to try and it was so shimmery I tried it on my cheeks inside and absolutely love the result! 

Read more to see the products I used :) 

Wednesday, 16 April 2014

Spring Inspired FOTD


I wore this look out to a friend's birthday the other night and absolutely loved it! I was inspired by my new hair colour which is much lighter than my natural hair so I decided to go with something more along the lines of spring trends despite it getting colder down here in Australia.

Monday, 24 March 2014

15 Minute Makeup

It seems like time is always of the essence these days and to have an hour to sit down and do your makeup seems like an impossible luxury . However, looking great doesn't have to take a super long time. With the right tools and products you can be glammed up in the smallest amount of time. This is a look I wore for a night out with friends.


Read on to see how I did this look 

Wednesday, 15 January 2014

Red Carpet Glamour: Inspired Makup Look

My red carpet inspired makeup look was inspired by choices for best dressed at the 2014 Golden Globes - Taylor Swift and Zooey Deschanel. 

I chose a natural eye look with a bit of shimmer, a thin winged liner and flirty lashes (if I new how to apply false eyelashes I would have!), a full coverage foundation - I skipped powder because all the celebrities on the red carpet had dewy, glowing skin - and added a little bit of cream blush to add further dewiness and a subtle pink the the cheeks. Finally, a classic, glossy red lip.


Also thanks to my lovely brother who agreed to take some photos of me without too much resistance!

Coming up in the next couple of posts I have a few reviews so stayed tuned :)

xx Cat ^.^

Friday, 13 December 2013

Pink for the Faint Hearted


I always envy girls who have the confidence to pull off bright pink lips and lust over gorgeous pink shades of lipsticks, blushes and eye shadows whilst thinking that I just couldn’t pull it off! With my hazel, greeny eyes I’d always stuck more with purple shades but with as we start to get into summer I decided to be bolder in my makeup choices. I’m definitely not one to ever have worn bright pink (or even pink at all!), especially since I’m super pale. However,  was inspired by the beautiful shade 'Peaches and Cream" of the NYX butter glosses and wanted to create a pink look that put me out of my comfort zone. I think this would be perfect for a daytime summer party, or if you are going out at night, instead of contouring your eyes with browns, at a bit of sparkle with silver or smoke it out with some grey or black shadow.

For the Face:

I used Clinique 'Redness Solutions' foundation in 01 Calming Alabaster - applied with a paddle foundation brush this gives AMAZING coverage, especially if you have trouble with redness like I do, particularly around the cheeks and chin. However, I prefer a matte look and the Redness Solutions makeup is more to the satin/dewy finish which just doesn't work with my oily skin. I always apply a power whether its a translucent finishing powder, or for a little extra coverage Australis' 'Fresh & Flawless' pressed powder in Natural. For blush I used the shade on the far left in my NYX 'Butt Naked' palette which is a beautiful peachy/pink with little gold specks, similar to NARS 'Orgasm' blush. I also used the bronzer on the far left and the more golden highlighter on the far right (all shades in palette pictured below.)
For the Eyes:

For a pop of pink colour of the eyes I used a shade from my Australis Paparazzi Perfect Eyeshadow in 'Frock n Roll' but to really make the colour stand out I recommend using an eyeshadow base in a white or beige colour. I used the NYX jumbo eye pencil in 'Milk'. 


I am absolutely OBSESSED with my eyelashes here - I have never made them look so long and full! I used Lancome's Hypnose mascara first to create length and then from the same range the Hypnose Drama to add volume. The shapes of the brushes in the Hypnose range are all very interesting and different and along with a fantastic formula are great for creating different looks.
For the Lips:

This is a very NYX inspired look from all the new products I have tried recently! Firstly I used the shade 'Tokyo' of their soft matte lip creams which is a beautiful, bright light pink and then to add a glossy texture and even more bright pink the butter gloss in 'Peaches and Cream'. I am absolutely obsessed with the beautiful colour, pigmentation and glossy texture of the butter glosses and can't wait to get my hands on some more. Very excited I can now just pop down to my local Target and pick some up!

Finished Look:


Hope you enjoyed this look!
Cat ^.^