Pages

Showing posts with label base makeup. Show all posts

Monday, 1 May 2017

High-End Concealer Battle // Worth the Splurge?


Considering I'm a massive makeup collector/hoarder its unsurprising that my concealer collection has grown *slightly* out of control. However, I have been enjoying rotating these different concealers depending on what look I'm going for. I wanted to start by saying I enjoy using all of these, however, some stand out more than others. I've also included the shade I use for reference. I would describe my skin tone as fair, with neutral to warm undertones.

// Urban Decay Naked Skin Concealer

Pros:
  • Medium-full coverage
  • Lightweight, thin formula
  • Easy to blend
  • Long-wearing
  • Limited creasing under the eyes
  • Sets to a matte, velvety finish, so you don't need to set with a power
  • This concealer has the perfect sized applicator that dispenses just the right amount of product - magic!
Cons: 
  • Can be a little more drying, particularly if you have drier skin.
  • Will need to layer the product to get a fuller coverage.
My shade: Fair Neutral (Light Warm is similar but more yellow)


Probably my least favourite (sorry Too Faced!)

Pros:
  • Light, thin formula
  • Easy to blend
  • Hydrating
  • Great for a more natural look
Cons:
  • Coverage is quite natural, so doesn't work very well on dark circles
  • Formula is too thin and hydrating to cover blemishes
  • The packaging can get quite messy with product spilling out the top
  • Not very long-lasting and prone to creasing under the eyes
My shade: Very Fair - This shade is quite similar to my skin tone, so not great for highlighting. If you are fairer than me you might have trouble finding a shade.


Apparently one of these is sold every 26 seconds!

Pros:
  • Very high coverage
  • Thin formula that doesn't feel thick or cakey 
  • Blends easily
  • Limited creasing under the eyes
  • Long-wearing 
Cons:
  • Giant applicator can dispense way too much product! Not too much of an issue but make sure to scrape off any excess
  • Only available in Australia from tarte.com so you will have to try and shade match yourself using swatches online.
  • I found that this concealer doesn't layer well over other correctors/concealers, which you don't necessarily need because the coverage is so high!
My shade: Fair - The lightest shade out of all these concealers. Perfect for when I want a really highlighted look.


Pros:
  • The formula is so light and thin its pretty much undetectable on the skin!
  • Beautiful for highlighting and perfect for brightening under the eyes
  • Blends easily
  • Super versatile - can be used all over the face including to highlight under the brows and to define the lip line.
Cons:
  • Not cruelty free
  • Incredibly expensive! I spend a lot of money on makeup but the price of this makes me cringe a little.
  • This is not really a concealer, the formula is targeted towards brightening so needs to be layered over something else as it won't actually cover anything on its own.
My shade: No.2 (I could definitely go a little lighter for a more highlighted look)


Not necessarily a concealer, but I thought I would include this because I find this to be the BEST option for dark circles.

Pros:
  • Think colour theory - peach/orange shades are opposite blue/purple on the colour wheel - so it is amazing at counteracting darkness under the eyes.
  • Easy to blend
  • You only need a small amount of product 
Cons:
  • Not cruelty free
  • The formula is very thick and creamy so it's essential that you take your time to blend this in properly.
My shade: Light Peach. There are two different undertones - peach and bisque. Bisque is more pink toned perfect for neutral to cool skin and peach is more salmon toned and works better on olive and warm skin.

So who comes out on top?

My favourite is definitely the Urban Decay Naked Skin Concealer. However, if you're a full coverage fan, Tarte's Shape Tape has a similar thin, lightweight formula with that extra coverage! Also if you do suffer from blue or purple darkeness under the eyes, a corrector is the best way to go.

What's your correcting and concealing routine?

xx Cat

Tuesday, 23 February 2016

First Impressions // NARS Velvet Matte Skin Tint


Today, Mecca launches a whole range of exciting new products and the NARS Velvet Matte Skin Tint is one that I am the most excited about. As an oily-combination skin girl I love my matte finish foundations and couldn't wait to try out this new release from NARS. I've been giving it a good test run over the last week and wanted to share my thoughts so you can decide if you want to pick it up!

For reference, I matched myself to the shade Light 0 Terre Neuve which is a perfect match for my skin tone. The bad news is those with very pale skin may find it difficult to find a shade light enough.

//The Claims

  • Oil-free skin tint that wears comfortably and controls oil throughout the day
  • Soft matte finish
  • SPF 30

//Application
At first I thought I would try applying the product with my fingers however, I found that left the product looking quite patchy on the skin and I had to go over with a beauty blender. After a bit of trial and error I found the best method of application was with a brush and to buff the product into the skin. The Velvet Matte Skin Tint leaves a really beautiful smooth, soft matte finish on the skin that still looks natural. In terms of coverage, for a skin 'tint' I found the coverage to be light-medium and I could definitely build it up with a second layer.

//Wear
My immediate love for this product was based on how well it wore throughout the day. The soft matte finish remained throughout the day without excessive oiliness shining through, even on my t-zone. As a glasses wearer, I constantly struggle with foundation rubbing off my nose but this is the first product I have tried that didn't rub off from my glasses which impressed me so so much.

// Cruelty free?
NARS does not test on animals and does not use any other suppliers to test on their behalf. Some NARS products do contain animal derivatives like lanolin.

***

After wearing this product for the last few days I can definitely recommend it as a great everyday base for anyone with oily-combination skin. It applies easily with a brush, sits beautifully on the skin and lasts really well throughout the day. It is also great to wear everyday as it has an SPF 30 and with 50mL of product it is great value.

The NARS Velvet Matte Skin Tint retails for $68 at mecca.com.au as well as in store at Mecca Cosmetica and Mecca Maxima.

xx Cat

Monday, 2 February 2015

FOTD// Peachy Keen


My go-to eye look recently has been pretty simple and sticking to mattes. However, I really wanted to play around with a little bit of colour and see what would work to make my eyes 'pop'. So I pulled out my LORAC Mega Pro Palette and inspired by the shades 'Apricot', 'Blush' and 'Merlot' created this fresh face of the day with peach tones throughout.

Starting with the base, I applied the Australis Primer all over the face and went straight to concealing using Benefit's Erase Paste under my eyes and then Maybelline Fit Me Concealer over blemishes and red spots. I'm obsessing over mineral makeup at the moment and the Maybelline Mineral Power Foundation and Finishing Veil have been favourites for a long time. Unfortunately they don't sell the finishing veil in Australia anymore but I highly recommend the foundation! To finish off the face, I added some warmth with Benefit Hoola Bronzer as well as the Shimmer Powder and Blush Stick from the Essence 'Bloom Me Up!' trend edition (which I forgot to photograph -oops!).
#dathighlight


For the eyes, I started by using the Max Factor Excess Shimmer Eyeshadow in '20 Copper'. This shadow has a really strange, mousey texture that I found is easier blended out with your fingers. All the other shadows I used were from the LORAC Mega Pro Palette. Through the crease I used 'Khaki', then starting in the inner corner I used 'Blush', 'Apricot' in the centre of the lid and then 'Mulberry' blended through the outer V. I applied 'Grey' right along the lower lash-line and blended 'Merlot' along the outer third of the eye up to the top lashes. I absolutely loved the look of the shimmery peachy shades with the dark berry shades to deepen the look!

To finish off the eyes, I curled my lashes and applied a few layers of the Elizabeth Mott It's So Big! Mascara. For eyebrows I've gone back to using my Essence Eyebrow Designer in Blonde to create a natural, full brow. To complete the look I chose the new L'Oreal Color Riche Collection Exclusive Lipstick in 'Eva's Nude' for the lips which is such a beautiful peachy nude and I absolutely love the sheer, moisturising formula.
#moustache


xx Catherine
Follow me!

Instagram @_cat.mac
Twitter @cathsintents

Monday, 12 January 2015

Sweat-Proof Summer Makeup


It's gets pretty hot during summer in Australia. I'm not talking just warm enough to walk around in pretty dresses or cute shorts, but an average day usually includes being drenched in sweat as the wall of heat hits you. This is definitely not good news for the longevity of your makeup. Luckily there are a few great products that make wearing makeup wearable during the hottest times of the year and also actually stays on your face.

The worst thing I could possibly think of on super hot day is wearing a thick layer of stuff on my face, which is why a light weight foundation is a great option for warm weather. I like the Chi Chi Super BB Cream [$22.95] which gives decent coverage and evens out the skin tone. Another great option is MAC Face and Body Foundation [$49.00-$60.00], which is practically undetectable on the skin, has an amazing finish and can be built up for a fuller coverage without the cakey-ness.

Oh and of course a primer underneath your foundation will also help extend the life of your makeup look. I like Benefit's Porefessional [$53.00] to fill in pores and Laura Mercier Foundation Primer [$45.00] to lock in moisture.

Although I do prefer a fresh, dewy glow for a summer look, I definitely don't want to look either oily or sweaty. The line between 'glowy' and 'sweaty' is a fine one so setting your base with a powder is a must. My favourite this summer has definitely been MAC Mineralise Skin Finish Natural [$49.00]. This does everything you want from a setting powder - gives a flawless finish, sets your foundation in place and doesn't look cakey or powdery at all.

For the eyes, again a primer will help colour stay on your eyelid and not migrate into the crease. The NYX Jumbo Eye Pencil in Milk is a great base for powder shadows to stick to. However, I usually opt for a cream eyeshadow like the Maybelline Colour Tattoos which are also really easy to apply. And if you're looking for a long lasting blush, something like the Benefit Cheek Stains will stay on all day, or if you prefer a powder the Tarte Amazonian Clay 12-Hour blushes, really do last well, even in the heat.


xx Catherine
Follow me!

Instagram @intentsbeauty
Twitter @cathsintents

Friday, 20 June 2014

Garnier BB Cream: First Impressions Review

I recently picked up the Garner BB cream for oily to combination skin at Priceline while it was 50% off! It usually retails for $13.99 but with all drugstore brands shop around at different chemists, supermarkets and department stores like KMart, Big W and Target because its bound to be on sale at one of them.


First Impressions:

The first thing I noticed when I started to apply this on my face was the smell of alcohol. I've never experienced this with a product before and was slightly shocked that the product could smell so strongly. I checked the packaging and alcohol is the third listed ingredient. I mean I know my skin is oily but I didn't think I would need this much alcohol to control it!

Despite there being an orange tint to the BB cream, the colour match was decent and the orange-ness blended away into my skin nicely. One layer definitely reduced my redness and smoothed out my skin overall but I was having a bit of a bad skin day and stubborn red spots around breakouts and sensitive areas were not hidden.

I added another layer which definitely improved the redness but I still went on and added concealer. I also felt this didn't do much to neutralise the puffiness/dark circles under my eyes. I know this is only a BB cream but I did have high expectations considering my Dr Dennis Gross CC Cream is really brightening under the eyes.

Garnier describes the finish as 'luminous matte'. There's nothing luminous about it to be honest which I prefer particularly since I didn't feel I needed to finish off with a powder.

Final Thoughts:

After a full day of wear, this product left me with a natural look for most of the day without a primer underneath. It wore away evenly and only really around my nose and mouth which I do have a habit to touch a lot. I really like the finish and was impressed with how natural it looked. However, it is a light coverage base and imperfections and redness aren't covered by this product.

This is not a bad BB cream, but not the best light coverage base I own and to be honest I'm quite skeptical about its claims that like a skincare product it will reduce pores, imperfections and dullness over time. The price is definitely reasonable though and considering I got it on sale for 50% off it was a fantastic deal and won't go unused. I will probably use this most if I want a little bit of coverage for work or if I need to leave the house in a rush. My word of warning for those with pale skin, even the light shade is likely to be too dark and for those with sensitive skin the amount of alcohol in this product probably won't do wonders for you either.

xx Catherine

Monday, 2 June 2014

Review: L'Oreal Nude Magique Eau de Teint Foundation

A relatively new release from L'Oreal and initially had thought I wouldn't pick it up because the shade range didn't seem to include any pale shades that would suit me. However, I received a sample for this foundation with my Priceline payback voucher and after one wear I had to get my hands on it!


The foundation has a light to medium coverage which is really impressive considering the formula is very thin, almost water like. I like to use the Real Techniques Buffing Brush to buff this into my skin. Because of the thin consistency it blends in beautifully. The shade is a little too dark for me, however, because it does blend in so nicely it is quite forgiving in terms of colour match. I have the lightest shade available on the Australian market, 120 Pure Ivory.

I absolutely love the powder finish which looks so velvety and does wonders for my skin! It reminds me of the finish of mineral powder foundation in the way that it melts into the skin and looks better as the day goes on. This foundation also lasts a usual long day of uni which is fantastic considering I don't need to powder over it. It's one of my favourites to wear on a long day because it looks the most natural after a long day of wear.

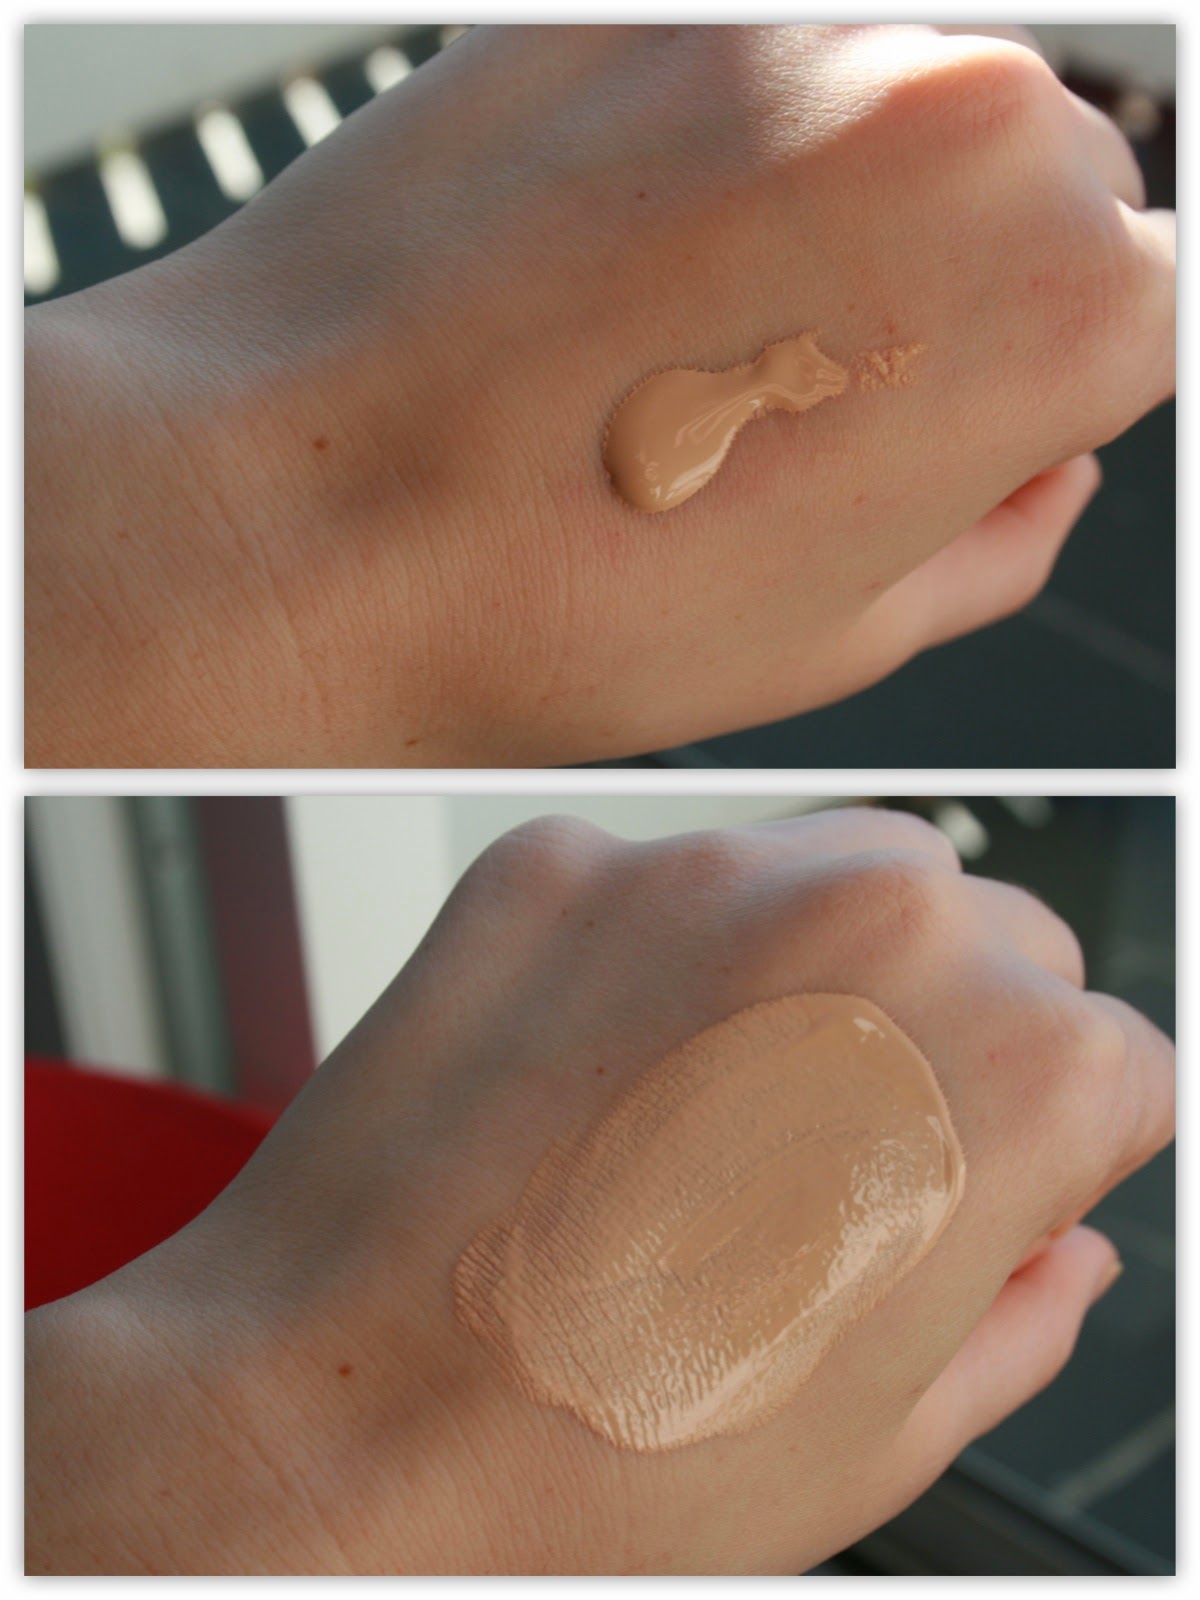
Without foundation
One layer of Eau de Teint Foundation
The big flaw with this product is definitely the packaging. I think that the small glass packaging definitely does look really luxurious but it is incredibly inconvenient. Particularly because the foundation itself is so watery, trying to dispense product out of the bottle by pouring it out is not easy. I can definitely see a lot of product being wasted (and a huge mess!) if you aren't super careful when pouring out the product. A pump is definitely need and something L'Oreal should consider. I'm also confused as to why there is only 20mL of product as opposed to the usual 30mL. This annoys me a bit considering it retails for $24.95 in Australia.

I love the finish and staying power of this foundation, however, because of the inconvenient packaging I don't see myself reaching for it as often as I would like.

xx Catherine

Friday, 23 May 2014

Review: Dr Dennis Gross CC Cream


Say hello to my new favourite every day base product. One fateful day after handing in a stressful assignment, I took a emotional trip to Bondi Junction to shop away my sorrows (I would end up getting my first HD for a law assignment so it really was a good day all round). The fluorescent lights and the soothing white decor of Mecca Cosmetic called my name and I walked in ready to release all my feelings and spend all my money.

Now after my very exciting story on to the actual review. The texture of the CC cream is really interesting, it is a moussey kind of texture that I find is best blended in using two fingers. It has a very light coverage which can definitely be built up. Even with one layer it evens out skin tone and covers redness. It is a perfect coverage to just have a nice light base for every day - just what I wanted. I got the shade fair which is absolutely perfect for my skin tone - I'm talking perfect match!

Wednesday, 19 March 2014

How to Hide It: Guide to Concealer

A few people have asked me lately for my recommendations on concealers so I thought I would put together all my knowledge about concealing and my favourite products into one post. What I have found is that its unlikely one concealer is going to fulfil all your needs - so I have broken down this guide into 3 different problem areas - Blemishes or pimples, under eye circles and redness/. For reference, I have an oily skin type - therefore I am susceptible to frequent breakouts and suffer from redness.

1// Blemishes

Unless you are very blessed with blemish free skin, you'll most likely want a concealer to cover breakouts or subsequent scarring. My main tips are:

  • Use a concealer with a waxy or cream consistency - I often have trouble with liquid concealers 'sliding' off my blemishes. 
  • Create a concealer 'sandwich' - start first by dabbing powder on your blemish, then concealer, then powder again. This really helps concealer to last all day. Make sure you are using very thin layers of product so that it doesn't become cakey.
  • Choose a concealer colour that is as close as you can find to the colour of your foundation - to hide a blemish you'll want it to blend in.
  • I like to use a small concealer brush and apply product by 'dabbing'
  • If you are applying product on active acne - for example a pimple where the skin has broken - use a brush that you can wash straight away or a cotton bud. You really don't want bacteria from active acne staying on your brushes or even into your product that will just transfer onto your skin again.
Currently I am using Laura Mercier Secret Camouflage Concealer. This product is oil free and is two toned so I can perfectly match the colour to my different foundations. The recommended retail price is AUD$49.00 so fairly pricey, but it is a product that will last a long time.

My drugstore recommendations are: Bourjois Happy Light Concealer AUD$19.00 or Essence Match2Cover! Cream Concealer $4.25 - the only issue with these concealers is that they have very limited shades, this is particularly a problem for those with darker skin tones.

2// Under Eye Circles

As a uni student, I often hang around a lot of people who haven't had enough sleep and under eye circles are the biggest giveaway. Fortunately for me (and the fact I am such a grannie and go to bed super early) I rarely get discolouration under my eyes. However, I still like to use a concealer under my eyes to highlight.
  • The main cause of under eye discolouration is a lack of moisture - fix the problem from the source by focusing your face moisturiser in the under eye area or even use an eye cream.
  • Because of the dryness in the under eye area, thick, waxy concealers are going to be too heavy and crease like crazy. Use a liquid or moisturising cream concealer.
  • Apply in an upside down triangle shape and blend
  • Sometimes the best way to blend in the concealer underneath the eyes is just with your fingers - super easy! I also like to use a small domed brush like the Real Techniques duo-fibre eye brush.
My favourite high-end under eye concealer is Benefit Fakeup Concealer AUD$35.00 and for my drugstore pick I like Maybelline Fit Me Concealer AUD$14.95. I am currently using both these products and definitely recommend! Benefit's Fakeup is super interesting because the concealer is surrounded by a hydrating layer with Vitamin E and appleseed and is really moisturising and doesn't crease at all. For a drugstore product, Maybelline's Fit Me has a decent amount of shades, doesn't crease on my skin and is fantastic for lightening up the under eye area.
3// Redness 

Although I don't technically use concealer to hide the redness on my face, I do use specific foundations to conceal it. I found the best way to hide redness and discolouration is to build up the coverage of your foundations in the areas where you have issues with redness.
  • Using a stippling or dabbing motion to build up coverage works best as it doesn't tend to create cakey-ness.
  • Start in the middle of your face when applying foundation - this is usually where the skin is going to be most red, particularly around the nose and chin - then blend outwards. This makes sure that you have the coverage on the areas you need and you're not putting too much product where you don't need it - saves product and looks natural!
I have been loving the Clinique Redness Solutions foundation AUD$50.00 as it has excellent coverage and definitely colour corrects redness. However, as I mentioned in the tips above, using any foundation and simply by adding more coverage in the areas where there is redness will help conceal those problem areas.

Hope you found this post helpful and have a beautiful day :)
xx Catherine

Sunday, 2 March 2014

Tarte Cosmetics/Sephora Mini Haul


When I hear someone is travelling to the US or anywhere with a Sephora I get VERY excited. I immediately thought of all the makeup I could buy! However, I thought to be considerate of the person kind enough to shop for me and also keeping in mind my budget, I chose a few special things that I've been lusting over from Tarte because there is literally no way to get their products in Australia unless you use a shipping service. Taking a few recommendations from one of my absolute favourite Youtubers Essie Button I picked up the;

  • Amazonian Clay 12 Hour Blush in Natural Beauty
  • Amazonian Clay Airbrush Foundation in Fair-Light Neutral
  • Airbrush Finish Bamboo Foundation Brush

I just wanted to share with you these beautiful products before I try them out and do full reviews - but really I just couldn't contain my excitement!
Thanks to Maddy's mum for picking up these products for me at Sephora and of course Maddy for helping organise everything <3

Hope you enjoyed this special haul as much as I did !
xx Cat  ^.^


Wednesday, 19 February 2014

Flawless Base; by Benefit

Another weekend, another trip to Benefit! Mum and I visited the Brow Bar for a wax and tint and then headed over to the beauty counter where some of the lovely staff treated us to a mini makeover/makeup lesson. I absolutely love visiting the Benefit counter because the staff are always so amazing and friendly.

I wanted to focus on complexion and try some products to create a really flawless base. The product I tried on my face was the Play sticks 3-in-1 foundation, concealer and powder. WOW! Just with one layer applied with a paddle type foundation brush it created the most flawless, full coverage base that looked liked it just melted into my skin but didn't feel like I was wearing such a full coverage product.

Look how much a difference a brow tint makes!
Since I just bought a new foundation last week, and the Play sticks are on the more pricey side, I decided to buy the Hello Flawless pressed powder instead since I was desperate for a new pressed powder! I have been using the Australis Fresh & Flawless and I was surprised that it didn't work for me considering it is widely reviewed as a great product, but even the lightest shade was way too dark and orangey for me. This shade is "I Love Me Ivory" which is a much better match for my skin tone. This is also beautifully finely milled and just takes the shine off without looking cakey - everything you need in a powder!

Although you're paying a little extra for Benefit products you're definitely getting a fabulous quality product in cute, sturdy packaging (I love how they close with a magnet) and it even comes with both a little brush and a sponge which is a really nice touch!

Overall another amazing experience at Benefit. I was super impressed with the products that created a truly flawless base. The Play stick has definitely gone on my wish list and I'm thinking of ordering it on the Benefit website to save some money.

xx Cat ^.^